How to repair motorcycle fairing
Have you ever dropped your motorcycle? If you have, you know how your heart sinks as you watch it hit the ground. When this happens, the fairing often gets cracked. You could spend $500 or more on a new one, which is to repair the motorcycle fairing, probably more than you have in your budget right now.
You only need:
The manufacturer recommends fairing primer and paints for use with epoxy sandpaper Epoxy is a great way to fix cracks, fill holes, and smooth out the surface of most plastics, metals, and wood. Also, it's simple to use. For times like this, it's good to have Cbr1000rr fairing Fast Cure Epoxy Mixer Cups on hand. It is a two-part glue that comes in easy-to-use cups.
Here's how to repair motorcycle fairing:
1. Use sandpaper with a 280-grit grit to smooth the area where you will put the epoxy. This will give the epoxy a rough surface to stick to. For a good grip, the surface needs to be rude.
2. Once sanding, remove any dust and clean the area.
3. Open the package and use the stick with it to push down in the middle. This is how you make a cup.
4. You'll see inside the package two different-coloured parts. One of epoxy and the other of amine. Using the stick on the applicator, mix the two parts until they are the same colour.
5. Use the stick to spread the mixed epoxy evenly around the crack using the applicator. Before the repair motorcycle fairing, you'll have between 5 and 15 minutes to work with it.
6. Wait 24 hours for the epoxy to harden, and then add more to the inside of the crack. Again, it will be ultimately better in 24 hours.
7. Once the paint has dried completely, you can do a light sanding to smooth any bumps.
8. Remove any dust or debris from the area, and then paint over it with the primer and paint recommended by the manufacturer.
And that's all you need to do. Throughout the weekend, the cost of some epoxy and paint is much cheaper than buying a whole new one.
Other Ways Your Motorcycle Can Use Epoxy
You can use epoxy to fix many different things on your motorcycle. You can:
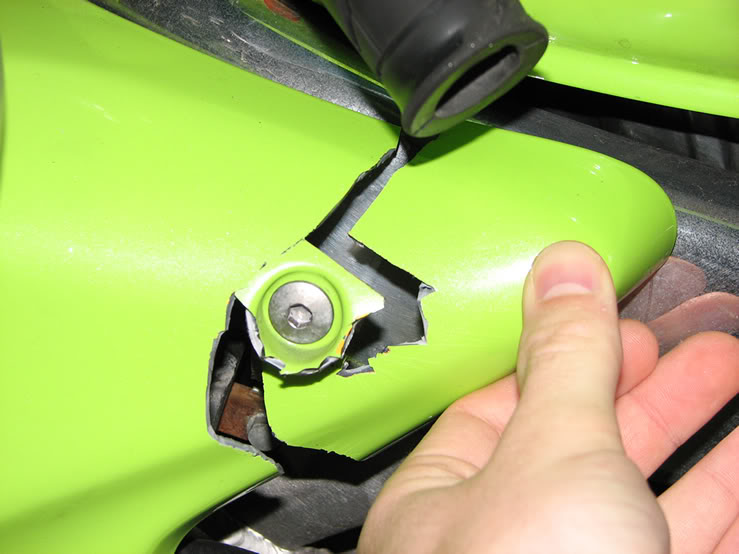
Repair the motorcycle fairing plastic boss that goes on a fairing. The threaded inserts in your fairing are held in place by a plastic piece called a boss. These can sometimes break or get weak, making the fairing lose. You can make them more robust by putting epoxy around the outside of the base and letting it dry.
- Repair any hard saddlebag damage.
- Fix any weak fairing brackets.
- Fix the bolts on the windshield.
- Strengthen any other parts that may be getting weaker from use.
STEP-BY-STEP INSTRUCTIONS
Step 1: Spread out the broken pieces and ensure they are all clean and dry. If the inside of the fairing. The paint needs to so that the filler can stick inside the fairing.
Step 2: Put the pieces together and hold them together with masking tape outside the fairing. Make sure the pieces fit as closely as possible after putting all the pieces together. Flip the fairing over and ensure that all the paint, dirt, and grease are gone.
Step 3: If there is a lot of damage, the area will need to. Cut the strips of reinforcement that came with the kit to fit the flat sizes. If you need to reinforce over curved surfaces, you can heat the strips and shape them to do the curve. You can score the strips with a knife and break them or use a wood saw or hack saw to cut them. It won't stick to surfaces that have been painted or are dirty. Clean up repair motorcycle fairing on each crack side with a Dremel, file, or coarse sandpaper.
Step 4: Spread a lot of filler cement over the cracks with the applicator bottle. The filler should go about 3/16" deep and cover 1/4" on each damaged side. When you use reinforcing strips, you should use enough filler cement that it squeezes out on all sides. After applying the filler cement, the fairing should be left alone in a warm place for 24 to 48 hours. It is ready when the filler cement feels hard and solid to the touch.
Step 5: Set out the broken pieces and ensure they are all clean and dry. If the inside of the fairing. The paint needs to so that the filler can stick inside the fairing.
Step 6: If some pieces are missing, you can use the supple reinforcing strips to make a new piece. Form the new part so that it fits as well as possible. Tape the pieces together like in step 2, and then follow the instructions for glueing. To fill the gaps, you might need filler cement on both sides. When the filler cement is hard, you can file and sand it to make it fit.
Step 7: You can use the filler cement as a body filler if you don't put it on painted or dirty surfaces. Please do not use a lot of fibreglass body filler because it does not bend well and will break after the piece has. Sandpaper with a fine-grit should smooth the surface and repair the motorcycle's fairing. Before painting, the area should be primed with a good primer and smoothed out with 400-grit paper.
Step 8: The top half of the fairing was painted, completing the repair. You can buy new decals at your local bike shop, order them from Quarical Products, and put them back on. It will look as good as new when.
When I bought my Ninja 650 to fix it up, I knew that the engine and the controls, fairing, and seat all needed a lot of cosmetic work. I had to learn how to repair the motorcycle fairing. I wanted to fix up the motorcycle so that it wouldn't be embarrassing and I could take it to a racetrack. At the track, I might crash it and have to fix the fairings all over again.
So, if you've ever dropped and cracked a fairing, it would be helpful to know how to plastic weld and re-paint it. After watching a few YouTube videos and reading some guides, I figured out a general way to fix fairings and wanted to write it down here so that it wouldn't get lost. I hope it helps. You might also be interested in my guide to fixing and recovering a motorcycle seat with vinyl.
What you need to repair the motorcycle fairing
An orbit sander — don't hand sand it! It will take a long time, your hands will hurt, and you probably won't do a good job. They don't cost much. Get a bunch of 80-grit to 400-grit sanding discs (or more)
Paint: You need half a can of primer, one can of colour, and half a can of clear coat for a large panel. Each can cost about $5. A basic soldering iron that is 30 to 60W. About $20. Get a mask that filters out as many particles and fumes as possible. Most likely black plastic zip ties, but clear ones if your fairings are light.


Log In